In May 1945 elements of the British East Indies Fleet undertook two overlapping operations Operation MITRE, an air and sea sweep of the Malacca Strait and south Andaman Sea for Japanese auxiliary vessels and DUKEDOM, an air and sea sweep to hunt for the HAGURO.
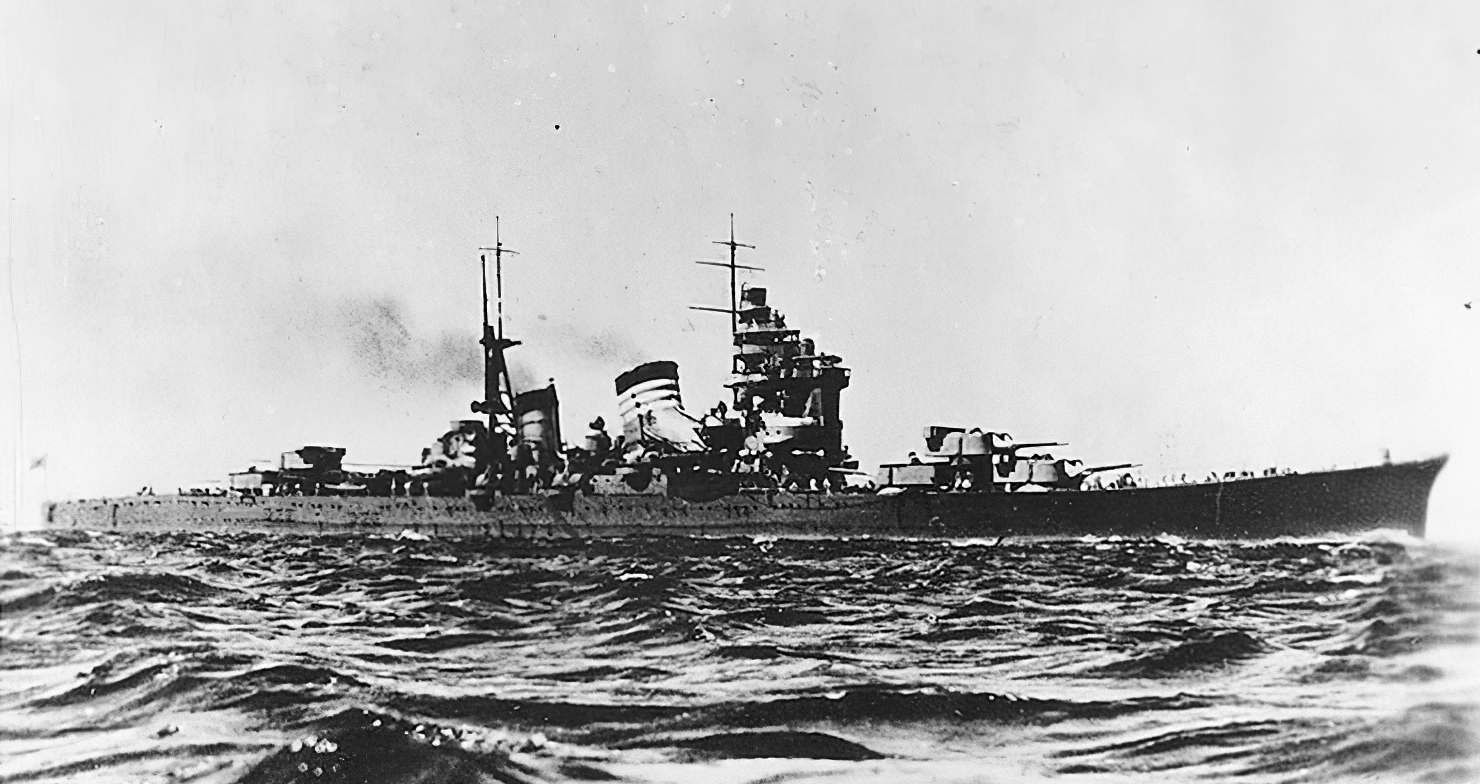
The men of the East Indies Fleet were celebrating victory in Europe when the news that the Japanese cruiser HAGURO, one of the last surviving major Japanese warships, escorted by the destroyer KAMIKAZE, were attempting to evacuate troops from the Nicobar and Andaman Islands to Singapore. At 22:30 on May 9th the submarines STATESMAN and SUBTLE, two of three submarines on patrol in the Malacca Straits, both reported sighting one Japanese cruiser of the NACHI class, with single destroyer escort proceeding north westward. Based on this intelligence the ships of the Third Battle Squadron and all available ships of the 21st Aircraft Carrier Squadron were ordered to prepare to put to sea to intercept them.
Both these forces had only arrived back in Trincomalee on May 9th, Force 63 the battleships QUEEN ELIZABETH (Flag BS.3, Vice Admiral H. T. C. Walker, CB), and Free French RICHELIEU, escort carriers EMPRESS and
SHAH, heavy cruisers CUMBERLAND and SUFFOLK, light cruisers CEYLON and Free Dutch TROMP, and destroyers NUBIAN, PENN, ROTHERHAM, TARTAR and VERULAM having been at sea for Operation BISHOP, the decoy raids intended to cover the Rangoon landings in Operation DRACULA. The 21st Aircraft Carrier Squadron, ROYALIST (Flag 21 ACS, Commodore G. N. Oliver, CB, DSO), PHOEBE (Fighter Direction Ship), CVEs
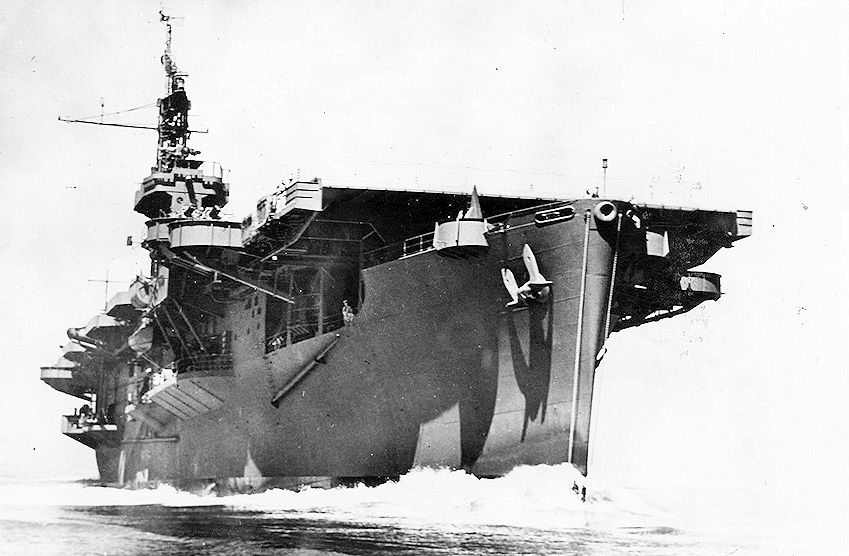
EMPEROR,
HUNTER,
KHEDIVE, and
STALKER screened by Destroyers SAUMAREZ (D 26), VENUS, VIGILANT, and VIRAGO had just competed Operation DRACULA.
The first of three groups of ships which comprised the hastily constituted Force 61, sailed at 06:00 on the morning of May 10th; group two departed first and comprised of the ships of the 21st Aircraft Carrier Squadron ROYALIST (Flag AC21), EMPEROR, HUNTER, KHEDIVE, SHAH escorted by destroyers ROTHERHAM (D 11, NUBIAN and PENN. Group one, comprising of the battleships QUEEN ELIZABETH (Flag BS3), HMNLS TROMP and the destroyer TARTAR (D10), and sailed next. The third and final group comprised of CUMBERLAND (Flag CS5), Free French RICHELIEU, and elements of the 26th Destroyer Flotilla SAUMAREZ (D26), VENUS, VIGILANT, VIRAGO, and VERULAM [sailed late, delayed by defects and joined the force at sea]. Force 70, an oiling force consisting of PALADIN and RFA EASEDALE, sailed from Trincomalee on the same day
Force 61 was tasked with intercepting the Japanese evacuation ships, later given the codename Operation MITRE, and to hunt for the HAGURO under the codename Operation DUKEDOM. The force set course for the 10 Degree Channel at 16 knots where it was hoped to intercept the cruiser as she headed north on the 12th. The destroyer PENN suffered mechanical problems shortly after sailing and returned to Trincomalee, TARTAR switched groups to replace her.
The first of three groups of ships which comprised the hastily constituted Force 61, sailed at 06:00 on the morning of May 10th; group two departed first and comprised of the ships of the 21st Aircraft Carrier Squadron ROYALIST (Flag AC21), EMPEROR, HUNTER, KHEDIVE, SHAH escorted by destroyers ROTHERHAM (D 11, NUBIAN and PENN. Group one, comprising of the battleships QUEEN ELIZABETH (Flag BS3), HMNLS TROMP and the destroyer TARTAR (D10), and sailed next. The third and final group comprised of CUMBERLAND (Flag CS5), Free French RICHELIEU, and elements of the 26th Destroyer Flotilla SAUMAREZ (D26), VENUS, VIGILANT, VIRAGO, and VERULAM [sailed late, delayed by defects and joined the force at sea]. Force 70, an oiling force consisting of PALADIN and RFA EASEDALE, sailed from Trincomalee on the same day.
Force 61 was tasked with intercepting the Japanese evacuation ships, later given the codename Operation MITRE, and to hunt for the HAGURO under the codename Operation DUKEDOM. The force set course for the 10 Degree Channel at 16 knots where it was hoped to intercept the cruiser as she headed north on the 12th. The destroyer PENN suffered mechanical problems shortly after sailing and returned to Trincomalee, TARTAR switched groups to replace her.
May 11th: At 05:00 SHAH had to slow down due to what was believed to be fuel contamination, NUBIAN was detailed to stand by her. Later in the morning further difficulties arose due to the lack of wind which required the carriers to constantly change course to operate their aircraft. SHAH had sailed with a defective accelerator and this was still unserviceable when she re-joined the main force. This meant that she could still not launch a fully loaded Avenger and a reshuffle of resources was ordered by Vice Admiral Walker at 14:30. SHAH should attempt to fly off 851 squadron’s Avengers, carrying minimum fuel and no armaments, to operate from EMPEROR while eight Hellcats from 800 squadron were transferred from EMPEROR to SHAH to join the detachment of four 804 squadron Hellcats already embarked. During this transfer process one of the 800 Squadron Hellcats had a deck landing accident that was to cause damage to 6 aircraft; the arrestor hook had caught on the metal frame of the after lift and the hook pulled out, the aircraft careered through both crash barriers into the Hellcats parked forward.
By 16:00 hours the transfers were complete and Force 61 resumed their south easterly course. By this time the force had been detected by a Japanese plane and their position reported. The delays encountered during the day meant the force would not reach the 10 Degree Channel in time and the Admiral ordered the force to split at 18:00, group 3, consisting of RICHELIEU, CUMBERLAND and the destroyers SAUMAREZ, VENUS, VIGILANT, VIRAGO and VERULAM were detached to proceed ahead to the 6 Degree Channel in the hope of intercepting the Japanese Cruiser.
May 12th: On the morning of May 12th it was reported that the enemy cruiser and destroyer were retiring south eastward – probably due to the sighting by Japanese aircraft of units of Force 61 to the westward of the Nicobars on the previous day. As a result of this information Force 61 proceeded to a position about 200 miles southwest of Achin Head, North Sumatra, and Force 70 was ordered to rendezvous for refuelling. It was hoped that if Japanese aircraft made no further sightings of the Force, the HAGURO might make a second attempt to reach Port Blair. At 15:00 Group 3 was ordered to return to the main Force and rendezvoused that evening.
May 13th: Beginning at 06:00 Force 61 commenced refuelling, the destroyers being oiled from the escort carriers. This operation was hampered by monsoon weather conditions and took most of the day. Intelligence was received in the morning that the Japanese were planning to launch Kamikaze attacks on the force so Admiral Walker decided to make a pre-emptive strike against Car Nicobar airfield. At 11:30 EMPEROR launched a strike force of four Hellcats to carry out a low level strafing attack on Car Nicobar. One of the Hellcats had to abort the mission and was escorted back to EMPEROR by another one of the strike force. The remaining two Hellcats carried out a successful strike destroying at least one aircraft on the ground. At 12:15 QUEEN ELIZABETH and other units of the Force picked up a radar contact, four Hellcats were flown off EMPEROR at 12:25 to investigate. Another four were ranged on deck at readiness. The interception was aborted almost straightaway and the flight was diverted to land on SHAH. During this incident the force had moved nearly 100 miles South from the position where the two returning Hellcats from the Car Nicobar strike expected them to be; on reaching the position they climbed to 12,000 feet and miraculously picked up EMPEROR’s Homing beacon at 85 miles. They landed on at 16:00.
May 14th: After steaming Northeast through the night the Force passed through the 6 Degree Channel at 04:00 on the morning of the 14th. Having received no news of the HAGURO by 05:15 Admiral Walker gave orders for Group 3 to remain in the area of the 6 Degree Channel while Groups 1 and 2, led by the QUEEN ELIZABETH reversed course and steered southwest to return to the refuelling area southwest of Pulau Bunta to rendezvous with Force 70 at approximately 15:30 hours.
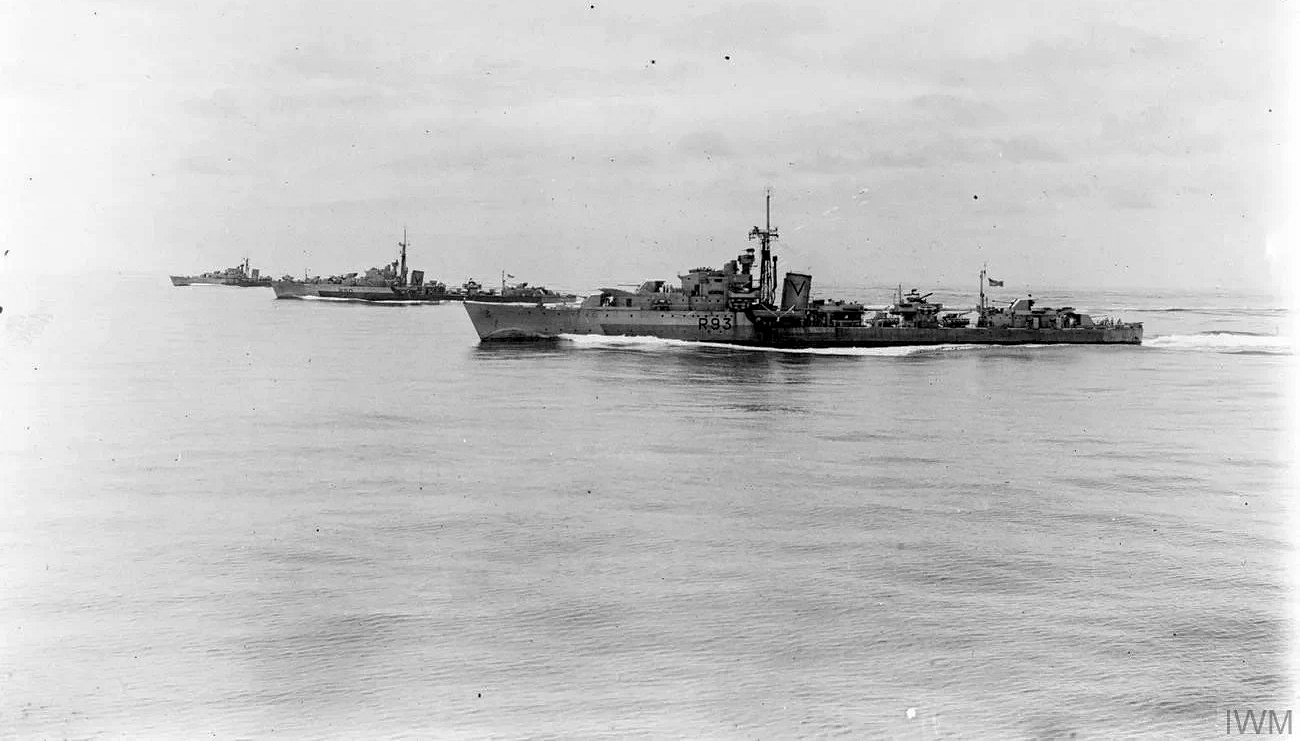
Still without reports of the whereabouts of the HAGURO, but with intelligence suggesting other shipping movements in a report of one small escorted transport heading South for Sabang expected to arrive on the 15th, Admiral Walker gave orders to implement Operation MITRE at 02:17 on the 15th; this was a specific operation to carry out an air and sea sweep of the Malacca Strait and south Andaman Sea for Japanese auxiliary vessels. The operation was to be jointly carried out by vessels of Walker's Force with RAF Liberators of 222 Group, however DUKEDOM had priority and MITRE could be cancelled at any time. The 26th Destroyer Flotilla, SAUMAREZ (D26), VENUS, VIGILANT, VIRAGO and VERULAM, was detached at 27 knots to lead the sweep, the remainder of the force following in support.
The intelligence was referring to the Japanese relief force, Force Two, the KUROSHIYO MARU No 2 escorted by submarine chaser CH- 57 which had evacuated troops from Nancowry Island in the Nicobars and had been sighted by a Liberator aircraft of 222 Group late in the evening of the 14th heading for Penang. Actually Naval intelligence was unaware that the HAGURO (Vice Admiral Hashimoto) and KAMIKAZE had been waiting off the Permatang Sedepa lighthouse, in position 2°53’ N, 100°59’ E, for news as to whether the British had sighted Force Two, which had sailed from Penang for Nancowry Island, where they arrived on May 13th. Believing the British had failed to detect Force Two Vice Admiral Hashimoto decided to make a dash for Port Blair, so the HAGURO and KAMIKAZE were on passage to Port Blair. However, for various reasons, this time Walker didn't get any sighting reports from the submarines stationed in the Malacca Strait.
At 07:00 a second British force, Force 62 comprising the cruiser NIGERIA with the 11th Destroyer Flotilla, (ROEBUCK, RACEHORSE, ROCKET and REDOUBT) rendezvoused with Force 61, having sailed from Trincomalee on the 13th to reinforce Walker’s force. The combined Force then set course to support the Destroyers of Group 3. At 07:30 in approximate position 4°30’ N, 93°30’ E, EMPEROR launched a reconnaissance/strike flight of four Avengers, each armed with four 500lb bombs, to search ahead of the force; the aircraft were given the call signs “Duty” Able, Baker, Charlie and Dog. Their instructions were to fly to a point, designated BB, which was in approximate position 6°20’’N, 94°35’E, then to diverge and fly a search pattern. The pilots had been briefed that on sighting the enemy convoy, (Force Two) they were to shadow and report.
At 09:37 in approximate position 6°44’ N, 97°3’’ E, Avenger “Duty” Charlie (JZ137), piloted by Sub-Lt J.G.V Burns, RNVR, sighted Force Two en route to Penang and made an immediate sighting report. He shadowed the ships until 09:50 expecting others in the flight to join him, when none had arrived he decided to attack; being at the extreme edge of their search radius dropping the bombs would extend their time over the target. His first run was with two bombs, one failed to drop, the other missed. Burns then attacked again dropping a single bomb, but without success, and while climbing away from his second pass he was joined by “Duty” Baker (JZ203, flown by Sub-Lt W.R.P. Bowden, RNVR)), which immediately attacked the Japanese force, missing with all four bombs. While diving on the KUROSHIYO MARU for their third run “Duty” Charlie was hit in the engine just as the bombs were released. The damage was severe but Sub-Lt Burns managed to pull up and turn onto a course for the fleet. Sub-Lt Bowden in “Duty” Baker formed up on Charlie as it began to lose height and prepared to ditch, which it did soon after. With some difficulty Sub-Lt Burn and his crew, Sub-Lt G.H. Robinson and P.O. (A). A. R. Murley, managed, to evacuate the aircraft and eventually to get into the life raft before their aircraft sank. “Duty” Baker reported the ditching and remained in the area, circling in the hope of pointing out the position to any rescuers, but none came before he had to head back to the ship.
At 10:04, almost exactly the time of “Duty” Charlie’s ditching, EMPEROR launched a further strike of four Avengers, with the call signs “Duty” Fox, George, Jig, and Hotel. The squadron C.O. Lt. Cdr M. T. Fuller RNVR was first to launch in “Duty” George, the next, “Duty” Hotel, reported his engine overheating while on the catapult but was launched to clear the deck and 10 minutes later landed on HUNTER. A fifth aircraft “Duty” King had been brought up from the hangar to replace Hotel. The report of “Duty” Charlie‘s ditching had just reached ROYALIST and the Avengers were ordered to remain over Force 61 to await orders, due to communication problems only “Duty” Fox (Sub-Lt J.A. Eedle) received the order and remained circling for an hour and a half before jettisoning his bombs and returning to EMPEROR only to crash into the barrier on landing. George, Jig and King continued on their search pattern, but were now looking for the life raft of Sub-Lt Burn and his crew.
The first of the early morning flight, “Duty” Dog (Sub-Lt Rowe-Evans, RNVR), landed on at 11;55, “Duty” Able (Lt K Crompton, RNVR) had reached the position given by “Duty” Charlie but saw nothing and returned to the ship to land on at 12:15. On reaching the expected position of the carriers “Duty” Baker found there were no ships in sight; reversing course he attempted to contact the destroyers he had seen earlier but with no success. Eventually Avengers “Duty” Jig and King appeared and “Duty” Jig escorted him towards the fleet; after 4 hours and 50 minutes in the air “Duty” Baker ran out of fuel at 12:10 and ditched 30 miles from the carriers, the crew were rescued by the 1700 squadron Walrus from HUNTER. Despite efforts to locate them, the crew of “Duty” Charlie were not rescued, their raft eventually made landfall in Burma but they were later taken prisoner. There had been some confusion over the use of the word ‘Convoy’ used in the briefing; to these aircrew a convoy would be made up of many vessels, not two, Sub-Lt Bowden had actually seen Force Two five minutes before Sub-Lt Burns but discounted it and moved on.
Just before ditching “Duty” Baker transmitted a fuller version of their earlier message of 10:03 giving the description of the ‘convoy’ as motor vessels not exceeding 2000 tons and their unsuccessful attack. This was received by Captain Powers in SAUMAREZ almost at the same time as another signal cancelling MITRE. Decisions were being made by the C-in-C in Colombo based on Naval intelligence reports and the cancel order was at odds with the intelligence just received. He decided to seek clarification and slowed his advance.
By this time only “Duty” George was still conducting a search, Jig and King had loitered over a group of unidentified (British) destroyers for 35 minutes before giving up trying to identify them, and so wasted valuable fuel. They split when “Duty “Jig joined up with “Duty” Baker to escort him home. “Duty” King did not reach the position of “Duty” Charlie’s ditching and returned to the fleet short of fuel only to discover it had moved again. After conducting a square search for 15 minutes he picked up SHAH’s homing beacon and landed on her deck at 11:45 with 40 gallons of fuel still in the tank, approximately 17 minutes flying time.
At 10:44 Lt. Cdr Fuller, in in “Duty” George sighted and reported the Japanese Force Two. Shortly after sending off his sighting report a second force was sighted, two further ships about 15 miles ahead of Force Two; these turned out to be the HAGURO and KAMIKAZE. At 10:50 a second signal reporting enemy cruiser and destroyer in position 06°55’ N, 96°50’ E, and retiring south eastward. The HAGURO had been found almost by accident and the result of errors and failures in communication; while “Duty” George was aloft a revised search area had been calculated taking into account currents and wind over the time since the ditching and this was transmitted but not received by the four Avengers. So Lt. Cdr Fuller and his crew were in the wrong place at the right time to stumble upon both targets. Sadly they did not locate the life raft they were looking for, unknown to the crew they passed within 400 yards of them after dropping their bomb load to extend their time on station. “Duty” George remained shadowing the Cruiser until 12:50 when they made a final course and speed report before heading back.
Following Lt. Cdr Fuller’s signals and updates a further strike force of three Avengers was ranged on EMPEROR’s deck, fuelled and armed by 13:50. These aircraft were given the call signs “Duty” Peter (flight leader, Lt Crompton), Queen (Sub-Lt Rowe-Evans) and Roger (Sub-Lt Eedle), all making their second sortie of the day. Their mission was to attack the HAGURO with 500lb bombs; ideally this should have been a torpedo attack but none of the Escort Carriers operating with the East Indies Fleet carried torpedoes. They were launched from a position 110 miles due west of Sabang and were to fly a dog-leg course to avoid the nearby enemy airfields.
Lt. Cdr Fuller in “Duty” George arrived back at the estimated rendezvous point at 14:32, this was where the fleet was expected to be calculated using the MLA, (Mean Line of Advance) but no ships were sighted. Eleven minutes later he switched his I.F.F. to “Distress” mode and a course to steer was radioed to them, he was then joined by two Seafires from HUNTER’s CAP flight which escorted him back to EMPEROR; he landed on at 15:15 after 5 hours and 11 minutes in the air.
Lt Crompton’s flight of three had reached the estimated position of HAGURO at 15:16, 16 minutes later than planned but she was not in sight, they then began a square-search with 15 mile legs. At 15:41 Lt Crompton sighted the Cruiser and her escort near the end of the third leg and began shadowing her until the other two re-joined. They attacked from astern starting their dive at 10,000 feet, Peter and Roger together, Queen a few seconds behind. Anti-aircraft fire was intense, one hit was scored on Peter’s wing and Queen was peppered with shrapnel splinters. All release their payloads; Peter and Roger pulled out at 3,000 feet and turned away at full speed, Queen continued on down to 300 feet and fled out to sea on the HAGURO’s starboard bow, reforming at 14:15 they set course for the fleet. They thought at least one of the 12 bombs hit and one a near-miss, but in reality they all missed. All three arrived back at EMPEROR at 18:30 and landed on; Sub-Lt Eedle in “Duty” Queen (JZ233) misjudged his landing and made his second barrier crash of the day. “Duty” Peter, Queen, and Roger had completed a 530 mile round trip flight to strike the HAGURO, the longest attacking round trip flight of any Fleet Air Arm aircraft. They had accomplished the first and only Dive-bombing attack by 851 squadron; this was also the first such attack on a major warship since the sinking of the KONIGSBERG in April 1940.
To the surprise of the squadron aircrew no further strikes were ordered, possibly because the target was believed to have passed the maximum range for another strike. Instead the chase was handed over to the 26th Destroyer Flotilla (SAUMAREZ, VENUS, VERULAM, VIGILANT, and VIRAGO) to engage the two ships. Captain Powers had been ordered to resume his original course at 27 Knots at 12:10 (then looking for Force Two), at 12:30 CUMBERLAND and RICHELIEU were ordered to re-join the destroyers, at best speed, to give them support. Captain Powers planned to make a night attack employing the single ship ‘Star-attack’ opening with a salvo of torpedoes.
May15th: VENUS made radar contact at 34 nautical miles, and positioned ahead of the Japanese ships and closing the gap. At 00:50 the HAGURO detected the 26th Destroyer Flotilla in front of her at 17,500 yards; Captain Power’s trap had been sprung. At 01:05, VENUS found herself parallel to HAGURO and found herself in a perfect attacking position; due to error by the Torpedo Control Officer the wrong angle settings were set on her eight tubes and the opportunity was lost. VENUS heeled hard over to port to clear the target area. Thinking that Venus had launched torpedoes HAGURO, altered course away to starboard to comb the tracks and increased speed to 30 knots, unwittingly turning deeper into the waiting trap.
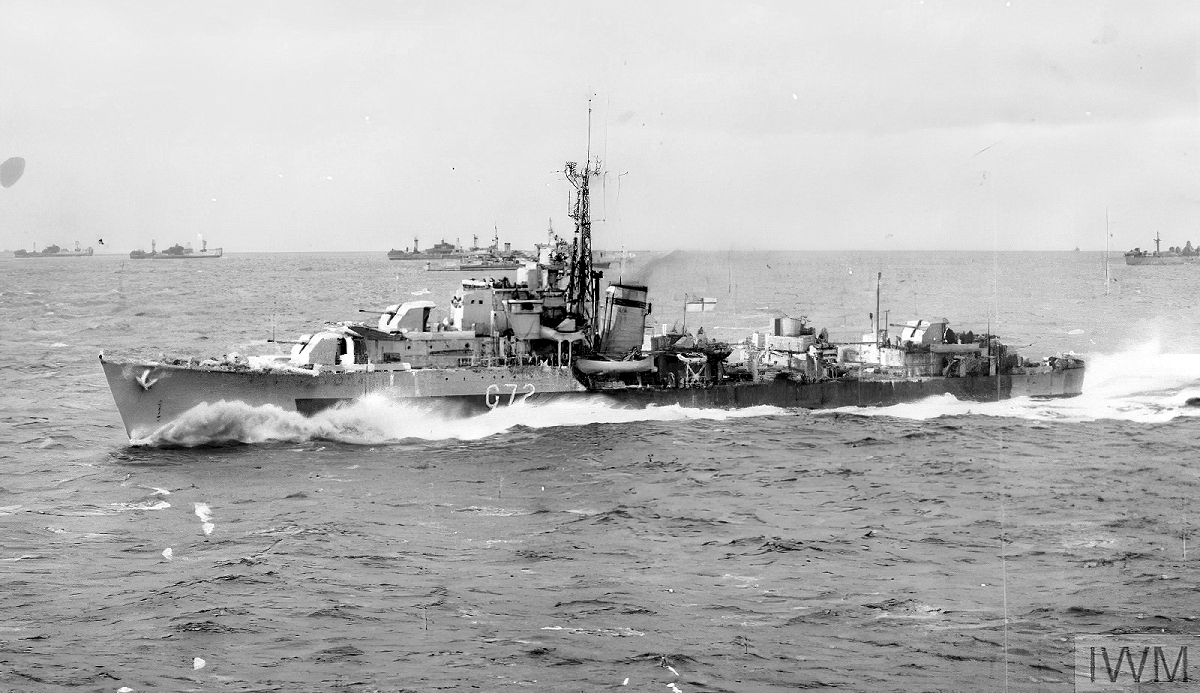
SAUMAREZ and VERULAM were now well positioned to make their attacks. HAGURO was off SAUMAREZ's port bow at a range of 6,000 yards, both closing at 30 knots. The KAMIKAZE now appeared off the starboard bow, crossing starboard to port 3,000 yards away on a collision course. SAUMAREZ opened fire, the second salvo from her two forward, radar-controlled 4.7in guns struck Kamikaze and 40mm Bofors shells from her aft twin-mounting ripped the 320ft length of the Japanese destroyer as SAUMAREZ heeled to starboard. HAGURO now fired a broadside of ten 8in and four 5in guns at SAUMAREZ.
At 01:11, just as she was about to fire torpedoes, SAUMAREZ was hit. The top of her funnel and main aerial disappeared over the side and an 8 in shell nicked the forecastle. One 5in shell penetrated No. 1 Boiler Room, severed a steam main and lodged inside the boiler. Three men were scalded, and two killed, No 1 boiler was put out of action. The shell had failed to explode at such close range and was later thrown overboard. The first torpedoes were fired at 01:13.
At 01:15, three torpedoes from SAUMAREZ and VERULAM hit the HAGURO. Another from VENUS hit HAGURO at 01:25, and VIRAGO stopped the Cruiser with two more torpedo hits two minutes later. She received another torpedo hit from VIGILANT, and the last two torpedoes were fired by VENUS at 02:02; having been hit by six torpedoes and nearly an hour of gunfire from the 5 Destroyers, HAGURO sank at 02:06 in position 4°49’ N, 99°42’ E.
The KAMIKAZE was damaged but escaped to the west, she had 27 dead and 14 injured. She returned later to pick up HAGURO survivors; 320 survived, but over 900 died, including the Japanese commanders, Vice-Admiral Hashimoto and Rear-Admiral Sugiura. The only British vessel to suffer damage was the SAUMAREZ.
Having fought the last major surface gun and torpedo action of World War II the flotilla formed up at 02:10 and steered north westerly to re-join the CUMBERLAND and RICHELIEU, still some 50 miles away.
Submarine chaser CH- 57 and KUROSHIO MARU No. 2 reached Pennag on the 16th. Still operating together they were detected by the submarine HMS TRIDENT on June 12th off Rondo Island, 20 miles north of Sabang, they were intercepted in position 06°20' N, 94°45' E by the destroyers ESKIMO, NUBIAN and TARTAR, the KUROSHIO MARU No. 2 was hit by torpedoes from ESKIMO and exploded, CH-57 was sunk by gunfire.
Revised August 2020
Sources:
Books
Winton, J. (1978) 'SINK THE HAGURO' London, Seeley Services & Co.
On line
combinedfleet.com website
http://www.combinedfleet.com/haguro_t.htm
http://www.combinedfleet.com/CH-57_t.htm© 1999-2026 The Royal Navy Research Archive All Rights Reserved Powered by W3,CSS
Comments (0)